Interface & reading
This chapter shows how the Pagelier window is laid out, how to read a document comfortably, move around in it, search for words and have it read aloud. At the end you will find every keyboard shortcut at a glance.
Window layout
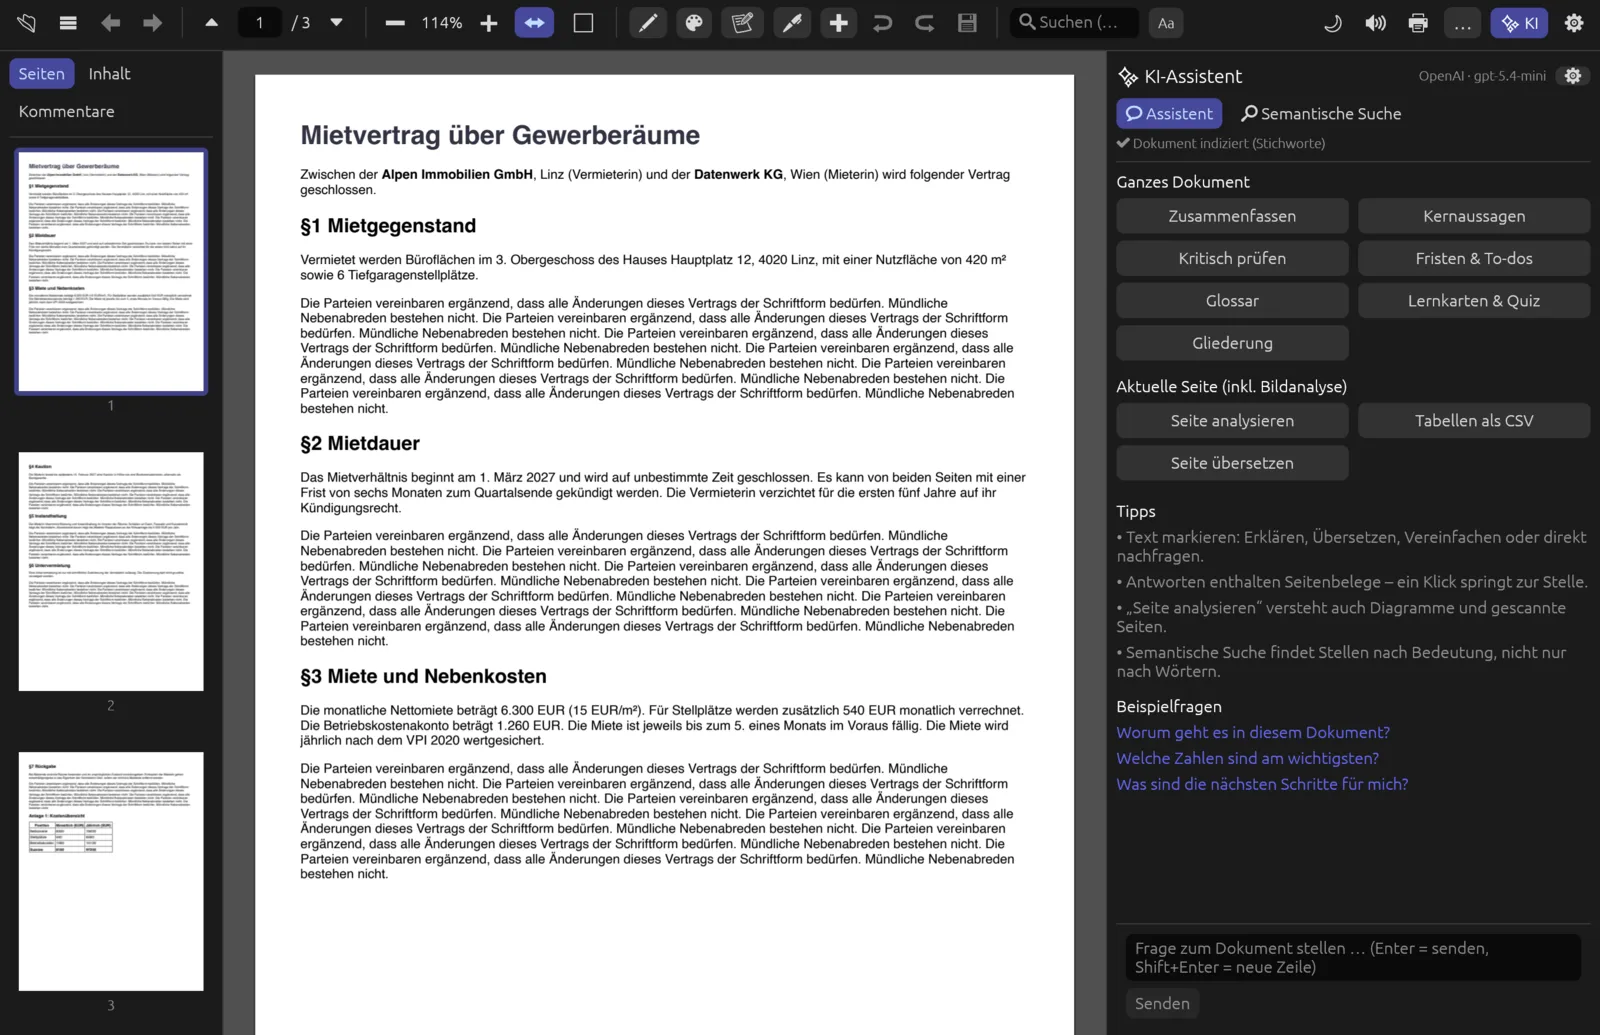
The window has four areas:
- Toolbar (top): open, navigation, zoom, tools for marking up and editing, search, print, the … menu and the AI assistant.
- Sidebar (left): thumbnails, table of contents, comments, search results and comparison results. ☰ shows and hides it; drag its right edge to change its width.
- Document (middle): the pages, one below the other in a continuous scroll.
- AI assistant (right): show or hide it with ✨ KI (AI) or ⌘ J. It has its own chapter, AI assistant.
When several documents are open, the tab bar sits between the toolbar and the document (see Getting started). Short messages such as “Gespeichert” (saved) appear for a few seconds at the bottom centre of the window.
The interface is in German. Shortcuts in this manual are given for macOS; on Windows and Linux press Ctrl instead of ⌘ and Alt instead of ⌥.
The toolbar
Hover over an icon to see its name and shortcut in a tooltip. From left to right:
| Icon | Tooltip | What it does |
|---|---|---|
| 📂 | Öffnen (open) | Open a PDF (⌘ O). |
| ☰ | Seitenleiste (sidebar) | Show or hide the sidebar. |
| ⬅ ➡ | Zurück, Vor (back, forward) | Go to the previous or next reading position, see Back and forward. |
| ⏶ page field ⏷ | Vorherige Seite, Seite, Nächste Seite (previous page, page, next page) | Turn pages; type a page number in the field and press ↩. The total number of pages is shown next to it. |
| ➖ 100% ➕ | Verkleinern, Vergrößern (zoom out, zoom in) | Zoom in 20 % steps; the current zoom level sits in between. |
| ↔ ⬜ | Seitenbreite, Ganze Seite (page width, whole page) | Fit the page to the window width, or fit the whole page. |
| ✏ 🎨 | Markierwerkzeug, Markierfarbe (highlighter, highlight colour) | Highlight text as you drag; choose the colour. See Mark up & comment. |
| 📝 | Notiz (note) | Click on the page to add a note. |
| 🖊 | Unterschreiben (sign) | Draw and place your signature. See Forms & signature. |
| ✚ | Bearbeiten (edit) | Shows a second bar with text, shapes, pen, stamp, image, form, redaction and crop. See Editing. |
| ↩ ↪ | Rückgängig, Wiederholen (undo, redo) | ⌘ Z and ⌘ ⇧ Z. |
| 💾 | Speichern (save) | Write changes to the file (⌘ S). |
| search field, Aa | Suchen, Suchoptionen (search, search options) | Full-text search, see Full-text search. |
| 🌙 / ☀ | Dunkler Lesemodus für Seiten (dark reading mode for pages) | Show pages dark, see Dark reading mode. |
| 🔊 / ⏹ | Vorlesen (read aloud) | Read the selection or from the current page onwards; stop. See Read aloud. |
| 🖶 | Drucken (print) | ⌘ P, see Printing. |
| … | Mehr (more) | The menu with all other commands, see below. |
| ✨ KI | KI-Assistent (AI assistant) | Show or hide the assistant (⌘ J). |
| ⚙ | Einstellungen (settings) | See Settings & Claude (⌘ ,). |
The “…” menu
The … button on the right of the toolbar opens a three-column menu holding every command that has no button of its own:
| Group | Commands | Covered in |
|---|---|---|
| (no heading) | Speichern unter … (save as), Seite als Bild exportieren … (export page as image), Text exportieren … (export text), Text erkennen (OCR) … (recognise text) | Getting started, Convert & export |
| Seiten (pages) | Append PDFs, rotate, delete or save a page as PDF, split, crop, change page size | Pages & documents |
| Dokument (document) | Header/footer, page numbers, watermark; bookmark; reduce file size; password protection; redact search results | Editing, Pages & documents, Protect |
| Ansicht drehen (rotate view) | ⟲ Links drehen (⌘L) (rotate left), ⟳ Rechts (⌘R) (right) | this chapter |
| Ansicht (view) | Einzelseiten (single pages), 📖 Doppelseiten (two pages), Buch (Titelseite einzeln) (book, cover on its own), ⛶ Vollbild (F11) (full screen), 📽 Präsentation (F5) (presentation), ℹ Dokumenteigenschaften (⌘I) (document properties) | this chapter |
| Umwandeln (convert) | Word document, all pages as images, images to PDF, open an Office file as PDF | Convert & export |
| Prüfen und vergleichen (check and compare) | Check document, compare with another version, suggest personal data for redaction | Check & compare, Redaction |
| Digitale Signatur (digital signature) | Digital signieren … (sign digitally), Signaturen prüfen (verify signatures) | Redact, protect & sign |
Esc closes the menu.
The sidebar
At the top of the sidebar you choose what it shows. Two tabs are always there; three appear only when needed:
| Tab | Contents |
|---|---|
| Seiten (pages) | Thumbnails of all pages with page numbers; the current page is highlighted. A click jumps to the page. This is also where you reorder pages by dragging and find rotate, delete and insert on right-click – see Pages & documents. |
| Inhalt (contents) | The PDF's table of contents (its bookmarks). Top-level entries are bold, sub-entries indented. A click jumps to the place. + Lesezeichen (+ bookmark) adds your own – see Bookmarks. |
| Kommentare (comments) | All annotations in the document, with their number in brackets. See Mark up & comment. |
| Treffer (n) (results) | Only after a search with results: every match with its page number and surrounding text. |
| Vergleich (n) (comparison) | Only while comparing two versions: the changes found. See Check & compare. |
Views and zoom
A document opens at page width: the page fills the width of the middle area and adapts when you resize the window or the side panels. To zoom:
- ➕ / ➖ or ⌘ + / ⌘ -: in 20 % steps.
- ⌘ + mouse wheel, or pinch on the trackpad: smoothly, around the pointer.
- ↔ or ⌘ 0: back to page width.
- ⬜: whole page – the current page fits entirely in the window.
Single pages, two pages and book
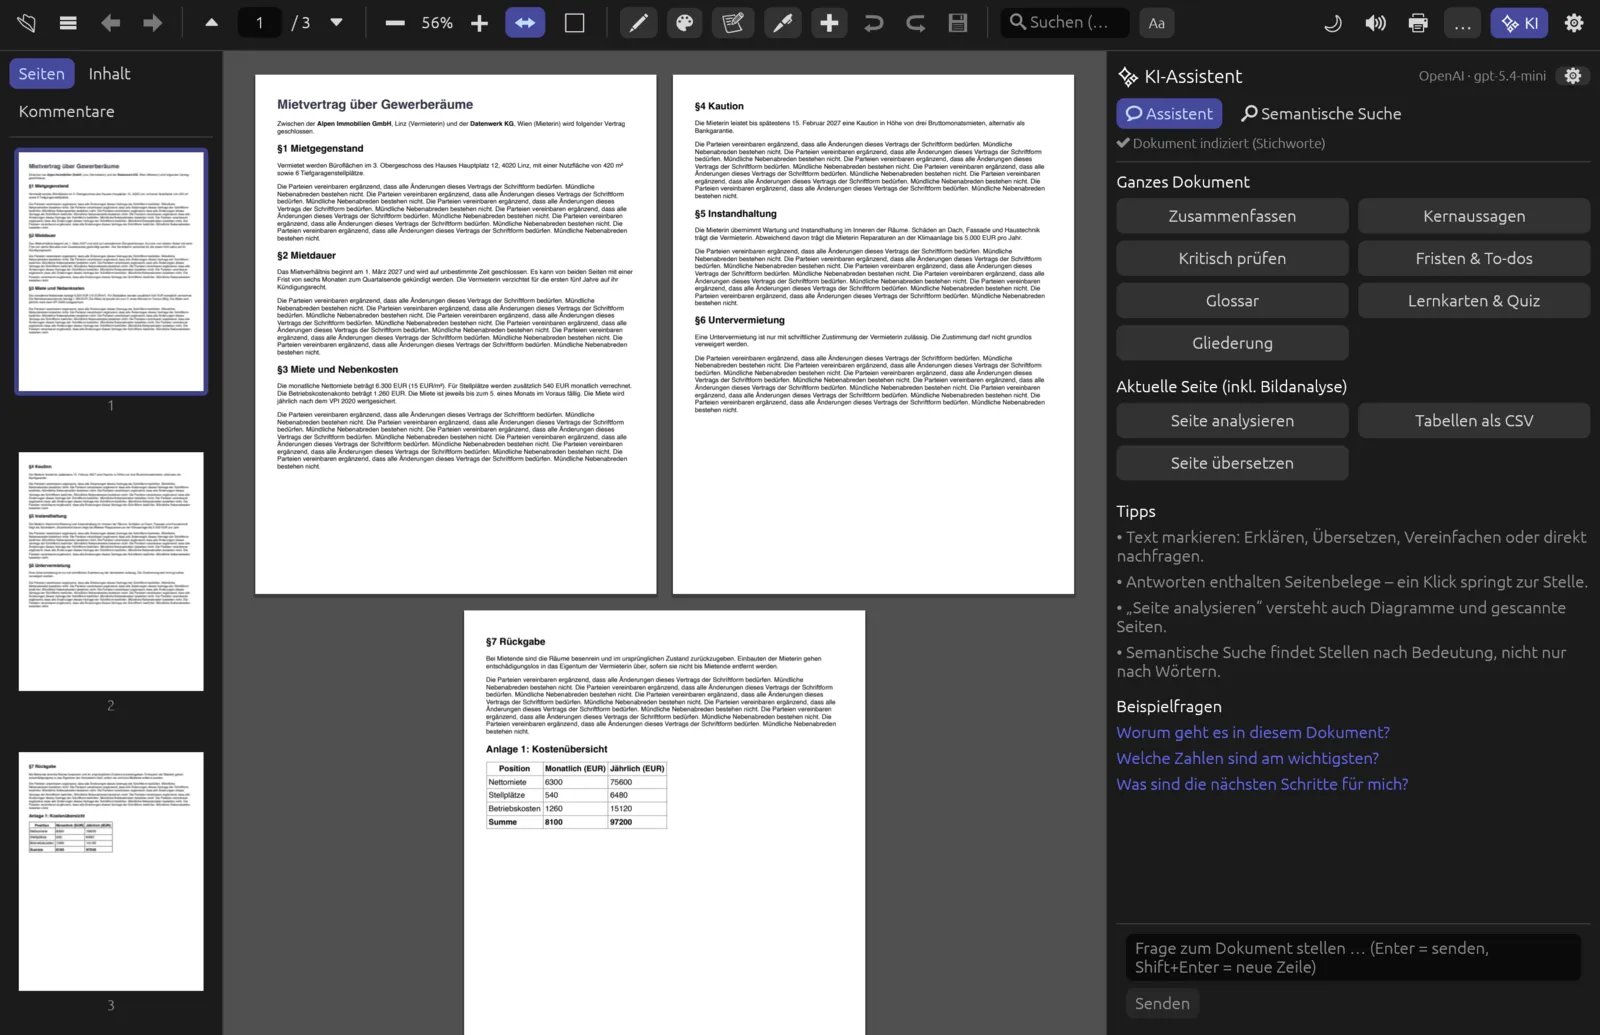
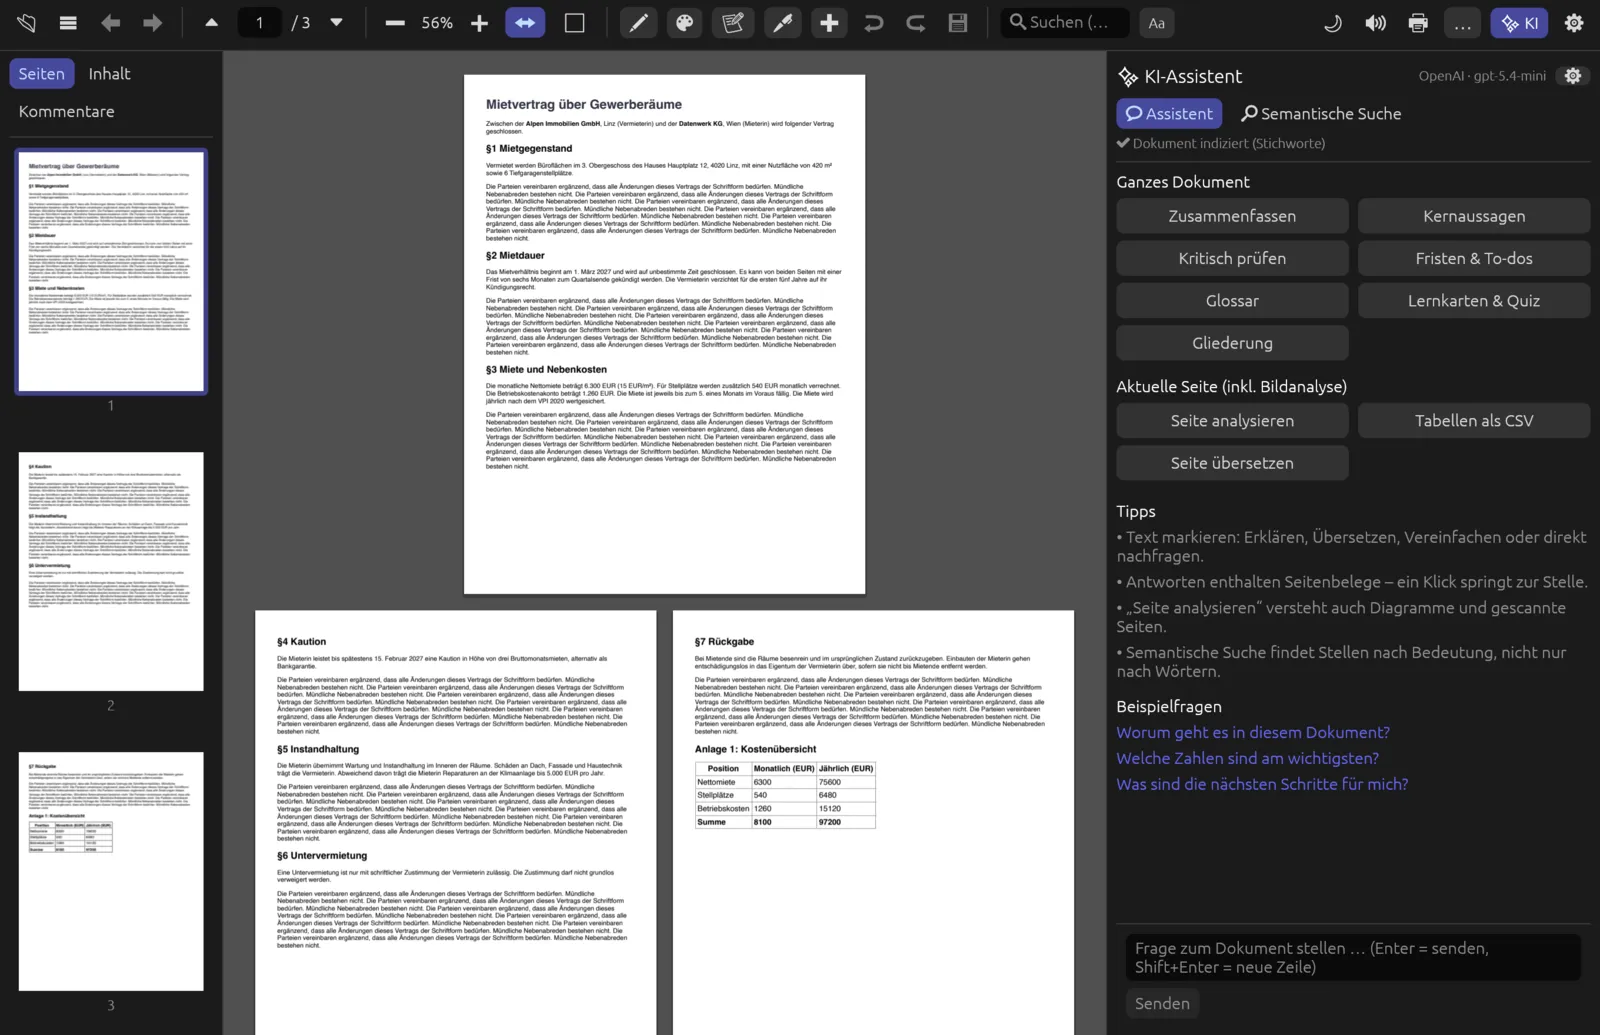
Under (view) you choose how the pages are arranged:
- Einzelseiten (single pages): one page per row (the default).
- 📖 Doppelseiten (two pages): two pages side by side, 1–2, 3–4 and so on.
- Buch (Titelseite einzeln) (book): the first page on its own, then pairs 2–3, 4–5 … – like an open book.
In both multi-page views, ← and → move a whole row at a time. The view you choose also applies to the next documents you open.
Rotating the view
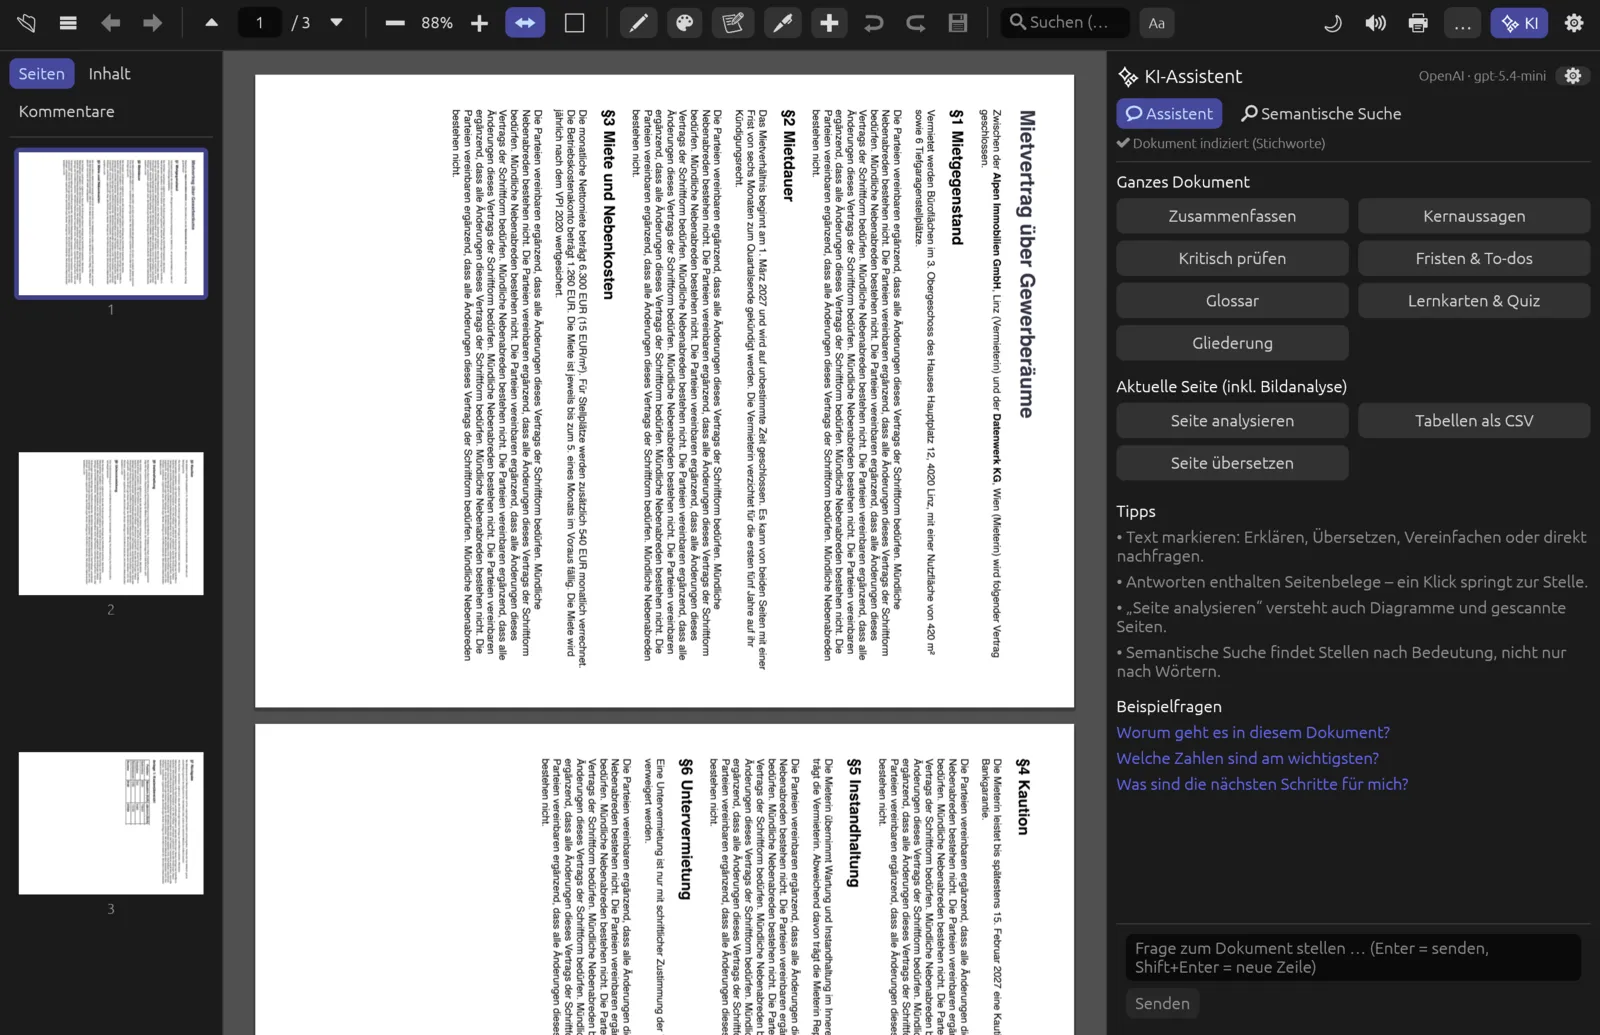
If a scan lies on its side, rotate the view in quarter turns with (⌘ L) or ⟳ Rechts (⌘ R). This only affects how all pages are displayed; the file is not changed. To rotate individual pages permanently, see Rotating pages.
Full screen and presentation
- ⛶ Vollbild (full screen; F11, on the Mac also ⌃ ⌘ F) switches the window to full screen; all bars stay visible. The same key switches back.
- 📽 Präsentation (presentation; F5) shows only the current page, fitted whole, on a black background in full screen – no toolbar and no sidebars. Move on with →, ↓, Page Down or the space bar; go back with ←, ↑, Page Up or ⇧ + space. Esc or F5 again ends the presentation and returns you to your previous view.
Present a PDF
- Go to the page you want to start with, for example via the thumbnails.
- Press F5 or choose . The page fills the screen.
- Move through the pages with the space bar or arrow keys; a presenter remote that sends Page Up/Page Down works too.
- Press Esc to end the presentation.
Dark reading mode
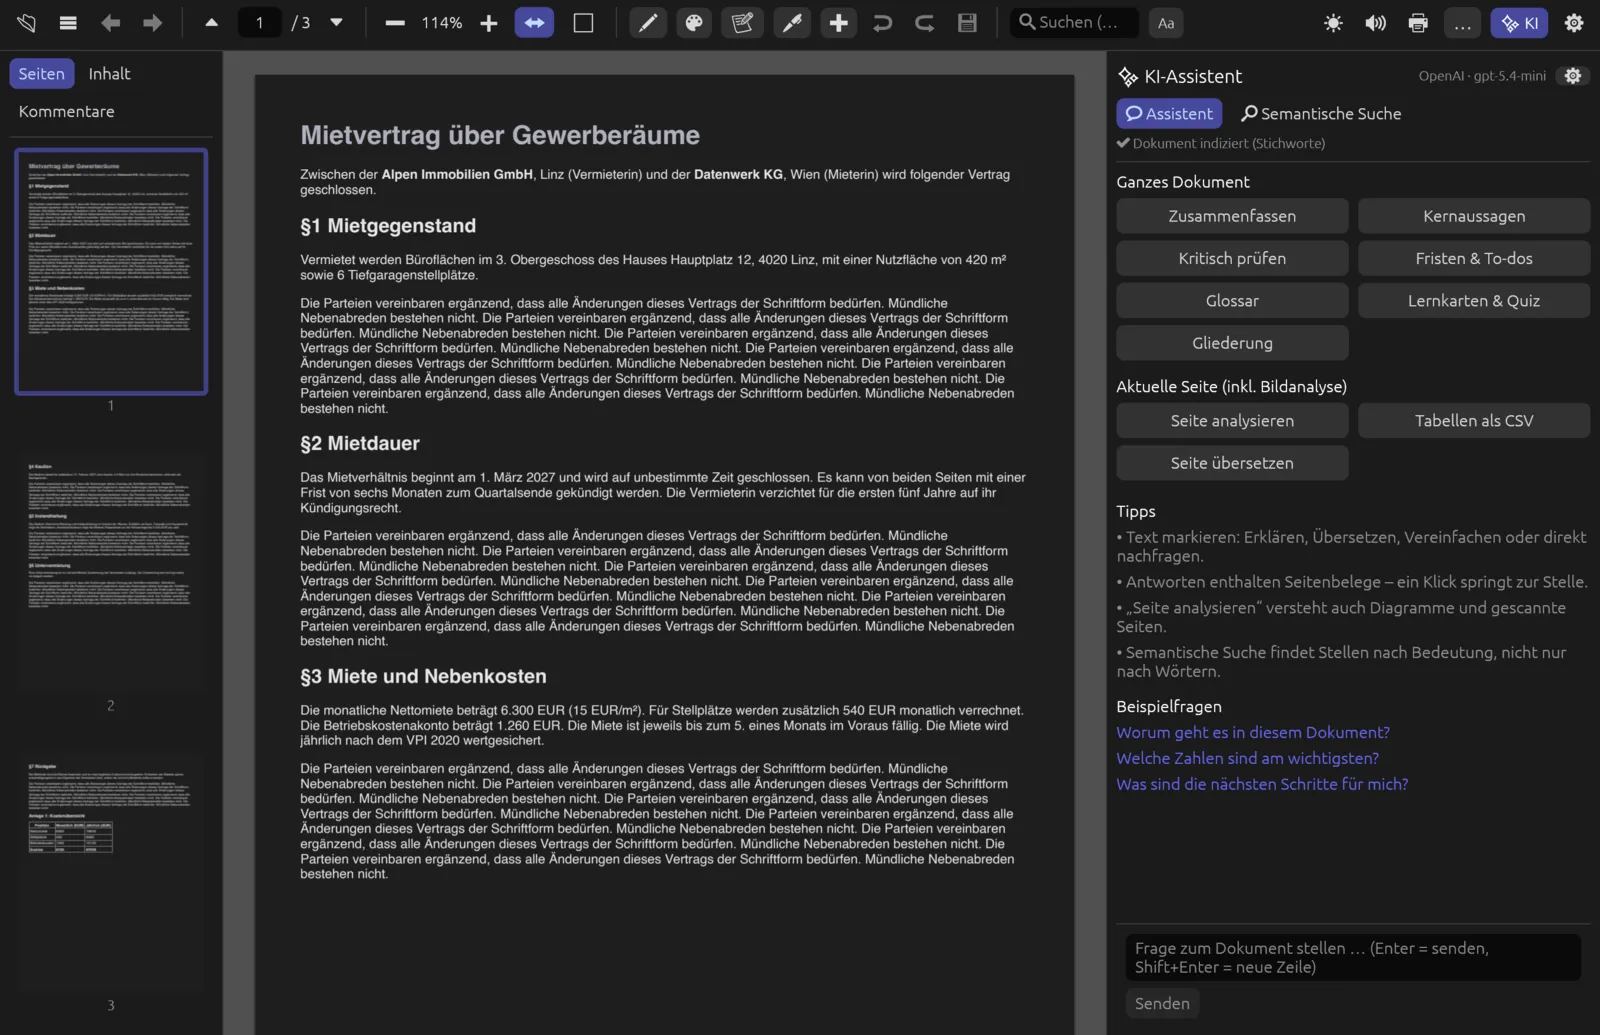
Clicking 🌙 (Dunkler Lesemodus für Seiten, dark reading mode for pages) shows the pages themselves dark: light text on a dark background, easy on the eyes in low light. The icon changes to ☀; click again to switch back. The setting is remembered and does not change the file. Whether the interface itself is light or dark is a separate option in the settings: Dunkles App-Design (dark app theme).
Document properties
(⌘ I) opens a small window with the file path, file size, title, author, subject, keywords, creating application and PDF producer (where present), creation and modification date, PDF version, number of pages, page size in millimetres with the paper name, and whether the file is encrypted. Esc closes it.
Moving around a document
| Goal | How |
|---|---|
| Scroll | Mouse wheel, trackpad or scroll bar. The page number in the toolbar follows the visible page. |
| Next / previous page | → / ←, Page Down / Page Up, or ⏷ / ⏶ |
| First / last page | Home / End (on the Mac Fn ← / Fn →) |
| A particular page | Click the page field, type the number, ↩; or click a thumbnail |
| A chapter | The sidebar's Inhalt tab, click the entry |
| A link in the document | Click it. Internal links jump to the target page; web and e-mail links (http, https, mailto) open in your browser or mail app. For safety, Pagelier does not open other kinds of link. |
Back and forward
Like a browser, Pagelier remembers where you were before you jumped – via a link, the table of contents, a search result, a page number or one of the assistant's page references. Turning a single page does not count as a jump. Go back with ⬅, ⌘ [, ⌥ ← or your mouse's side “back” button; go forward with ➡, ⌘ ], ⌥ → or the “forward” button.
Selecting and copying text
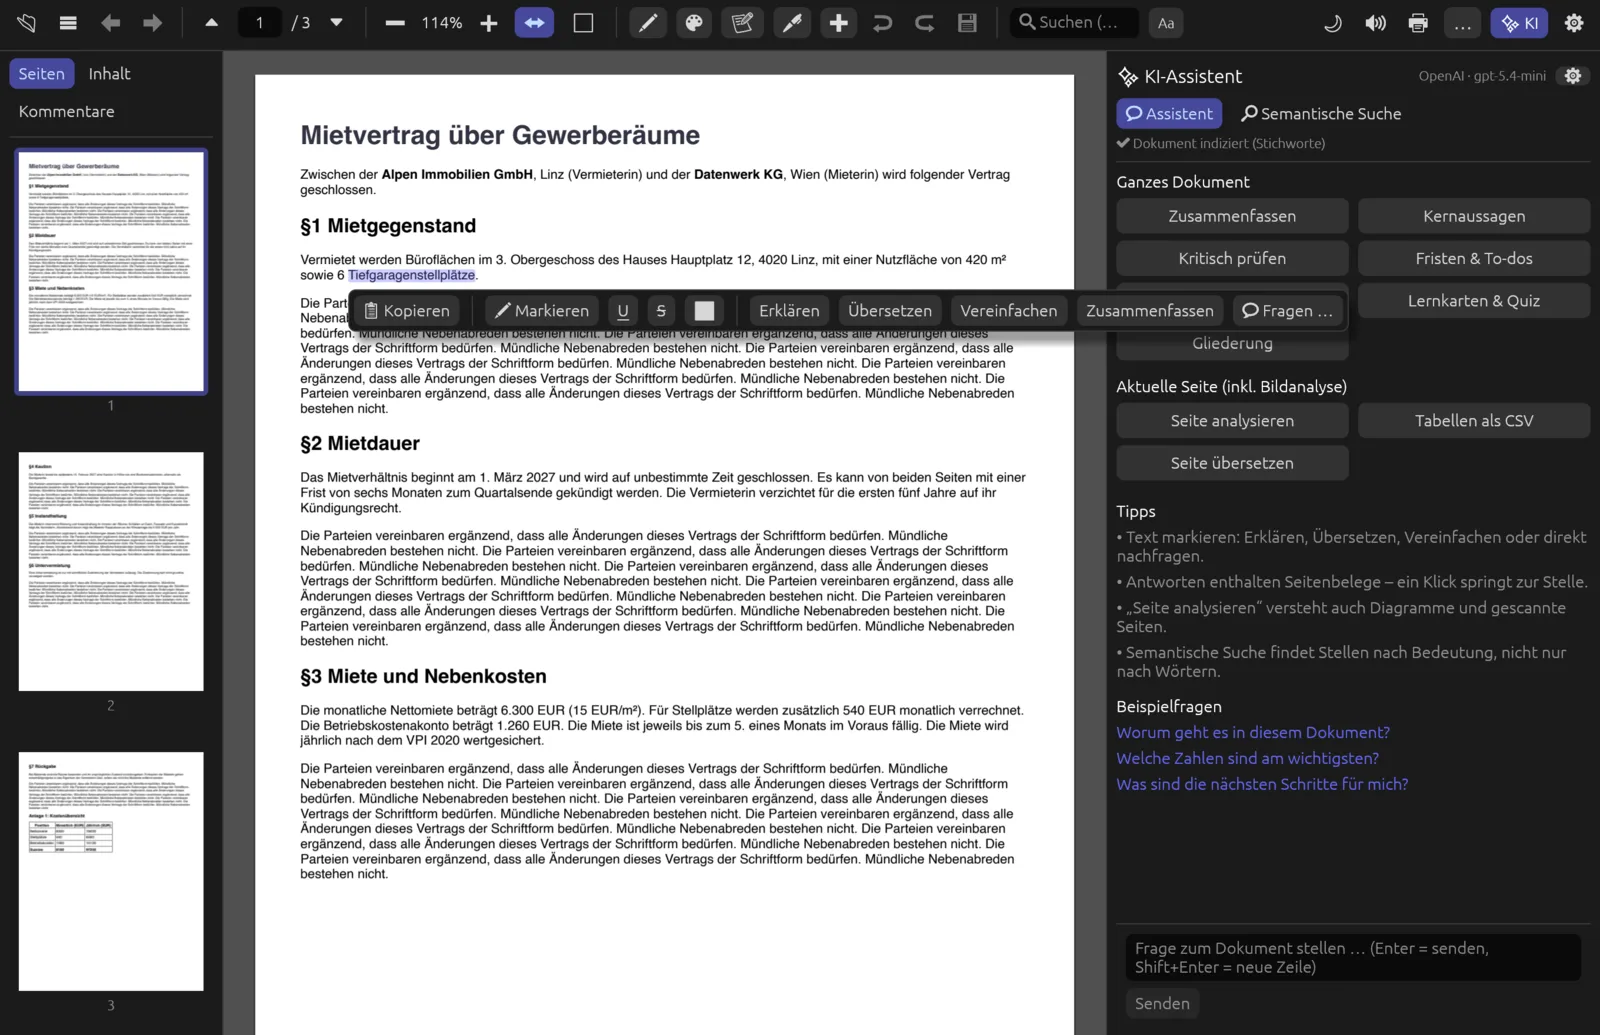
Drag across text to select it; a double-click selects a word. A small bar appears below the selection:
- 📋 Kopieren (copy) puts the text on the clipboard (also ⌘ C).
- ✏ Markieren (highlight), U (underline), S (strike through) and ⬛ (mark for redaction) – see Mark up & comment and Redaction.
- Erklären (explain), Übersetzen (translate), Vereinfachen (simplify), Zusammenfassen (summarise) and 💬 Fragen … (ask) hand the selection to the AI assistant.
Esc clears the selection.
Scanned pages often contain no text, just an image. Nothing can be selected or found on them until you run text recognition: , see Convert & export.
Full-text search
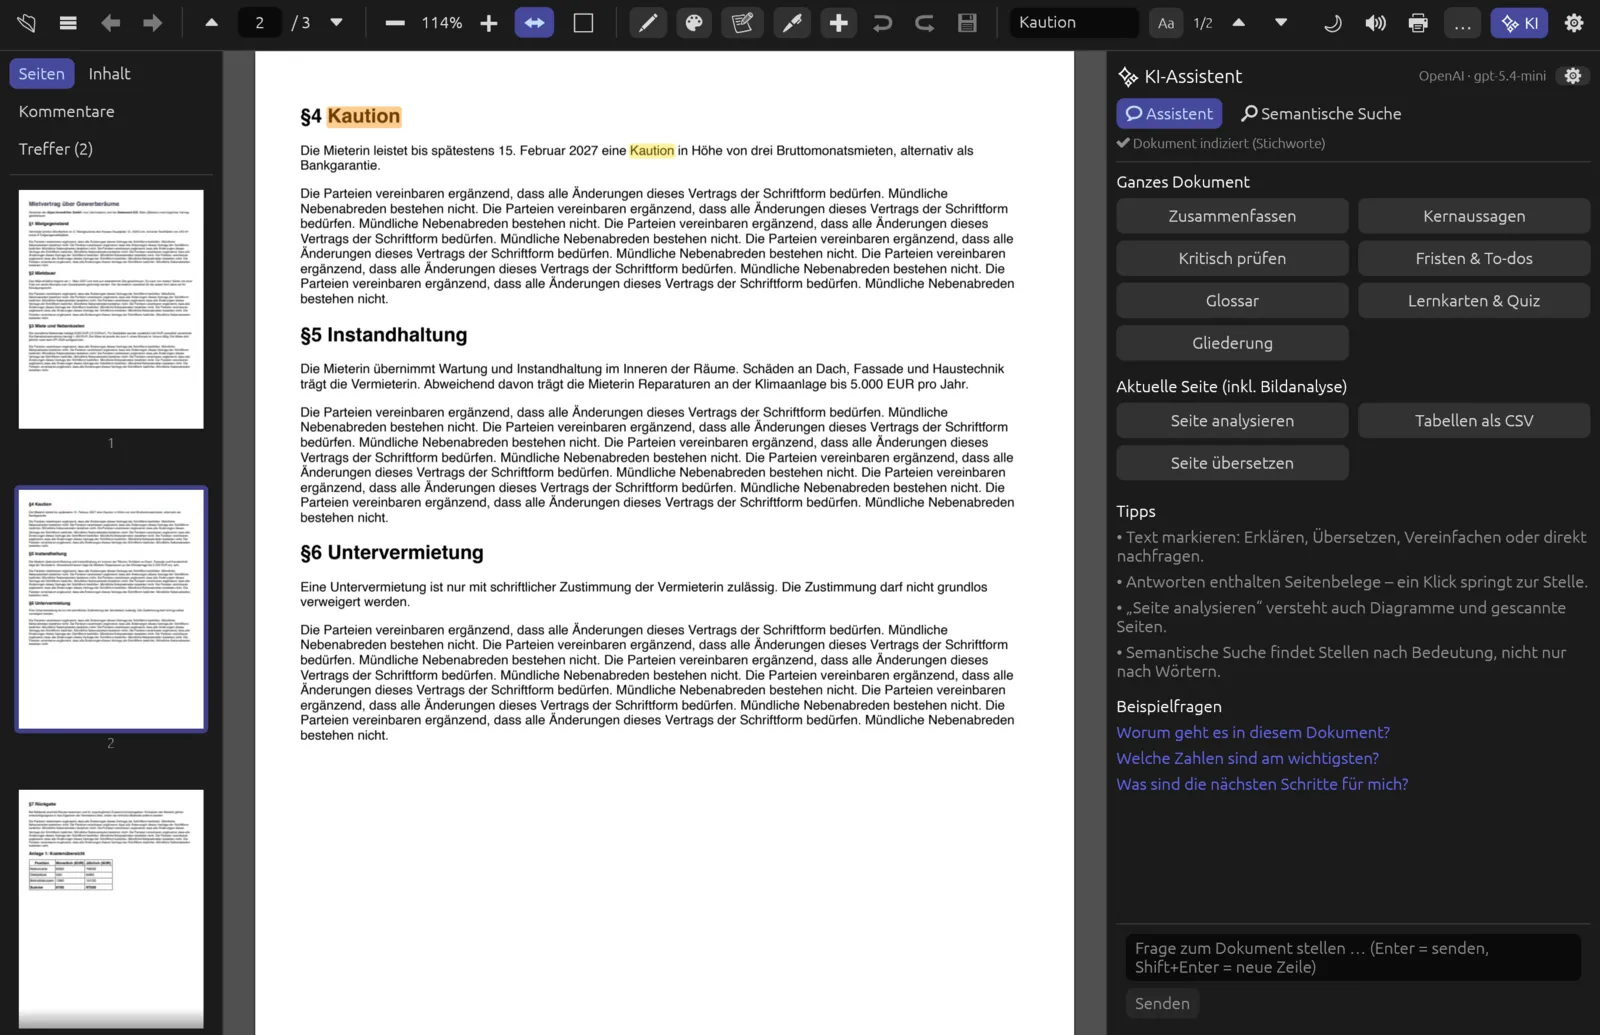
Click the search field in the toolbar or press ⌘ F, type a term and press ↩. Pagelier jumps to the first match from the current page onwards and highlights every occurrence; the current match is marked more strongly. Next to the field you see:
- the counter, such as 1/2 – or 0 Treffer (no results),
- ⏶ and ⏷ for the previous and next match. In the search field, ↩ and ⇧ ↩ do the same.
The sidebar also gains a Treffer (n) tab. It lists every match with its page number and the text before and after it; a click shows the match.
Aa next to the search field offers two options: Groß-/Kleinschreibung beachten (match case) and Nur ganze Wörter (whole words only). When an option is on, Aa is coloured. Clearing the search field removes the highlights.
Full-text search finds exactly the characters you type. To search by meaning – finding “termination of contract” when you look for “notice”, say – use the assistant's semantic search.
Go through every occurrence of a term
- Press ⌘ F, type the term, for example “Kaution”, and press ↩.
- If longer words containing it should not count, click Aa and turn on Nur ganze Wörter.
- Keep pressing ↩ to jump from match to match; ⇧ ↩ goes back.
- For an overview, switch the sidebar to Treffer and click the matches one by one.
- ⬅ takes you back to where you were before the search.
Read aloud
Pagelier reads text aloud using your system's speech output, choosing a voice that matches the language of the text.
- If text is selected, 🔊 reads exactly that selection.
- Without a selection it starts with the current page and carries on page by page, turning the pages as it goes. Pages without text are skipped.
- ⏹ or Esc stops reading.
If Pagelier says there is no text on this page to read, it is usually a scan; run text recognition first.
Have a passage read aloud
- Select the passage by dragging across it.
- Click 🔊 in the toolbar. The icon changes to ⏹.
- To stop early, click ⏹ or press Esc.
Keyboard shortcuts
On Windows and Linux use Ctrl instead of ⌘ and Alt instead of ⌥. Shortcuts without ⌘ only work while no text field is active.
| Shortcut | Action |
|---|---|
| ⌘ O | Open |
| ⌘ S / ⌘ ⇧ S | Save / Save as |
| ⌘ P | |
| ⌘ W | Close tab |
| ⌃ Tab / ⌃ ⇧ Tab, ⌘ ⇧ ] / ⌘ ⇧ [ | Next / previous tab |
| ⌘ 1 … ⌘ 8, ⌘ 9 | Go to tab 1–8, go to the last tab |
| ⌘ Z | Undo |
| ⌘ ⇧ Z or ⌘ Y | Redo |
| ⌘ C | Copy selected text |
| ⌘ ⇧ H | Highlight the selection |
| ⌘ F | Go to the search field |
| ↩ / ⇧ ↩ (in the search field) | Next / previous match |
| ⌘ J | Show / hide the AI assistant |
| ⌘ , | Settings |
| ⌘ I | Document properties |
| ⌘ + / ⌘ - | Zoom in / out |
| ⌘ 0 | Page width |
| ⌘ + mouse wheel, pinch | Smooth zoom |
| ⌘ L / ⌘ R | Rotate view left / right |
| → Page Down / ← Page Up | Next / previous page (a whole row in two-page views) |
| Home / End | First / last page |
| ⌘ [ / ⌘ ], ⌥ ← / ⌥ → | Back / forward |
| F11, ⌃ ⌘ F | Full screen |
| F5 | Start / end presentation |
| Space, ↓ / ⇧ + space, ↑ | In a presentation: next / previous |
| Esc | Close a menu or dialog; clear the selection, deselect the tool, stop reading aloud, end the presentation |