Redact, Protect & Sign
Before a document leaves your hands you often want three things: remove confidential content for good, secure the file with a password, and prove that nobody changed it on the way. This chapter covers redacting words, areas and search hits, AI suggestions for personal data, AES-256 password protection and digital signatures – including their limits.
Redacting
Redaction in Pagelier always takes two steps: first you mark areas, then you apply the redaction. Marked areas appear as grey rectangles with a red border – nothing has been removed yet, so you can check at leisure. As soon as something is marked, Pagelier shows the edit bar; next to ⬛ Schwärzen (Redact) you then see a red button with the count, e.g. 2 schwärzen (redact 2), and an ✖ (discard marked redactions).
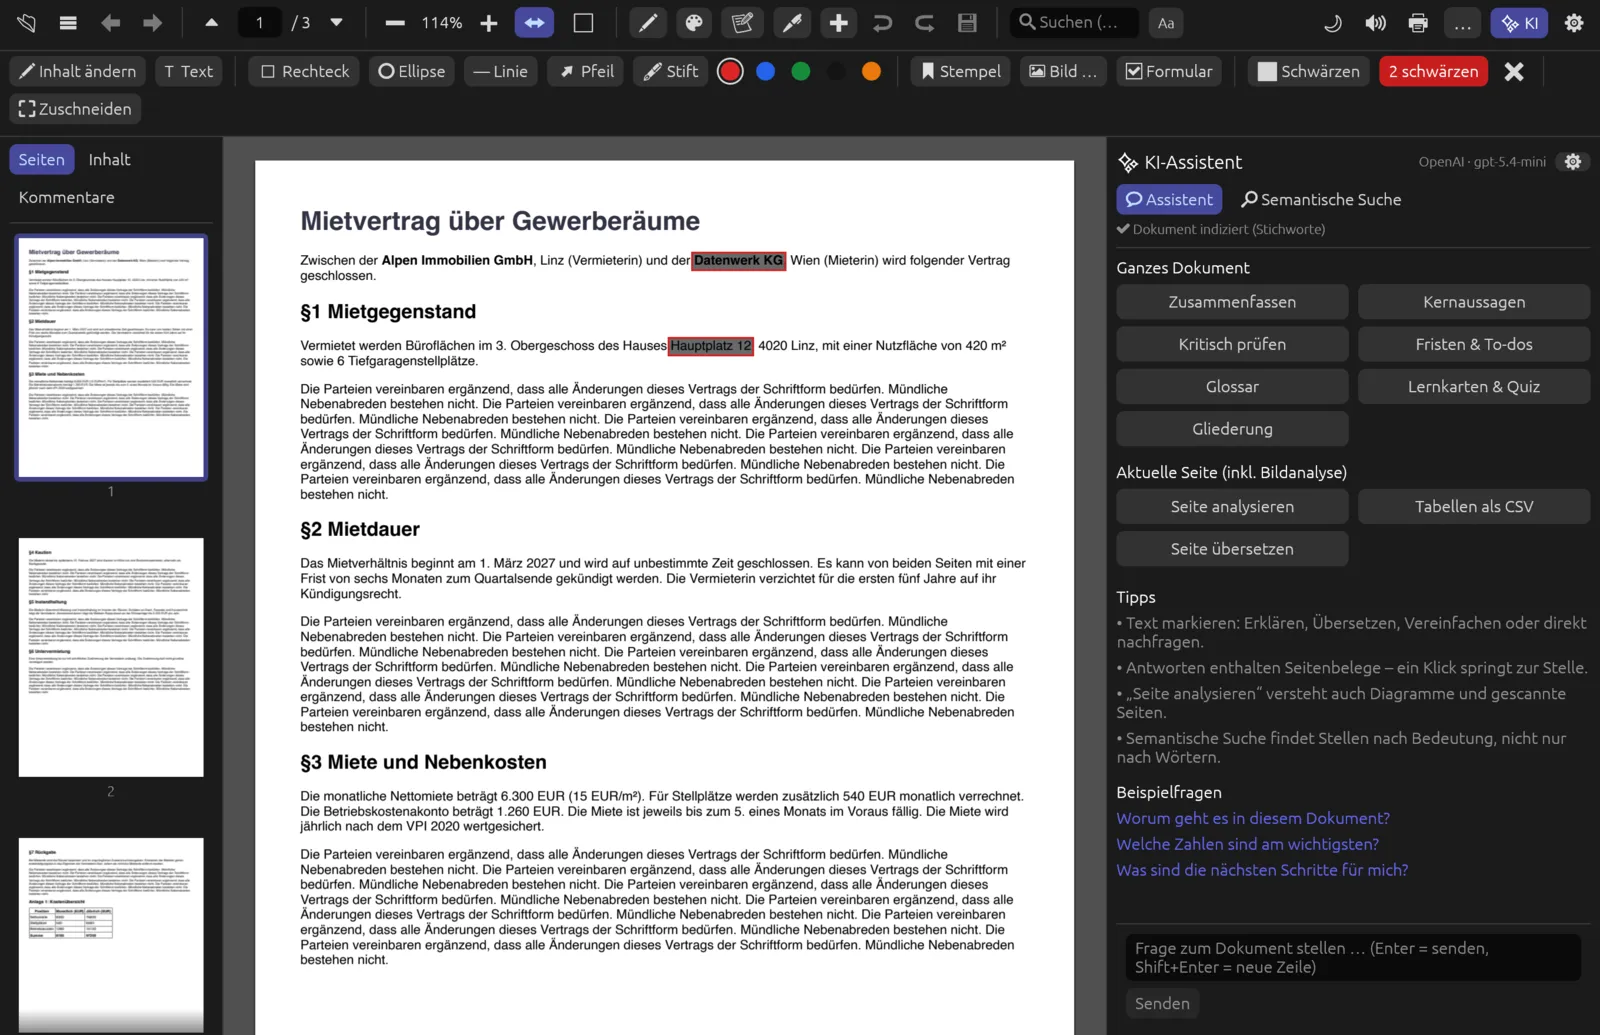
Marking areas
There are four ways to mark areas, and you can combine them freely:
| Method | How |
|---|---|
| Selected text | Select text with the mouse and click ⬛ (mark for redaction) in the small bar above the selection – or right-click and choose (Mark for redaction). |
| Area | In the edit bar (the ✚ button in the toolbar) choose the ⬛ Schwärzen tool and drag a rectangle on the page. This also covers images, signatures or stamps. |
| All search hits | Search for a term with ⌘ F, then choose (Document › Redact all search hits). Every hit in the whole document is marked. |
| AI suggestions | (Check and compare › Suggest personal data for redaction) – see below. |
If you don’t like a marked area, move the mouse over it and click the red ✖ at its corner – that discards just this one. ✖ in the edit bar discards all marked areas at once.
Applying the redaction
Clicking the red N schwärzen button removes the marked areas permanently. Pagelier rebuilds each affected page as an image, fills the areas with black and places the remaining text on top as an invisible text layer. The text under the black bars is gone from the file; the rest of the page stays searchable and copyable. Comments and links lying in a redacted area are removed as well.
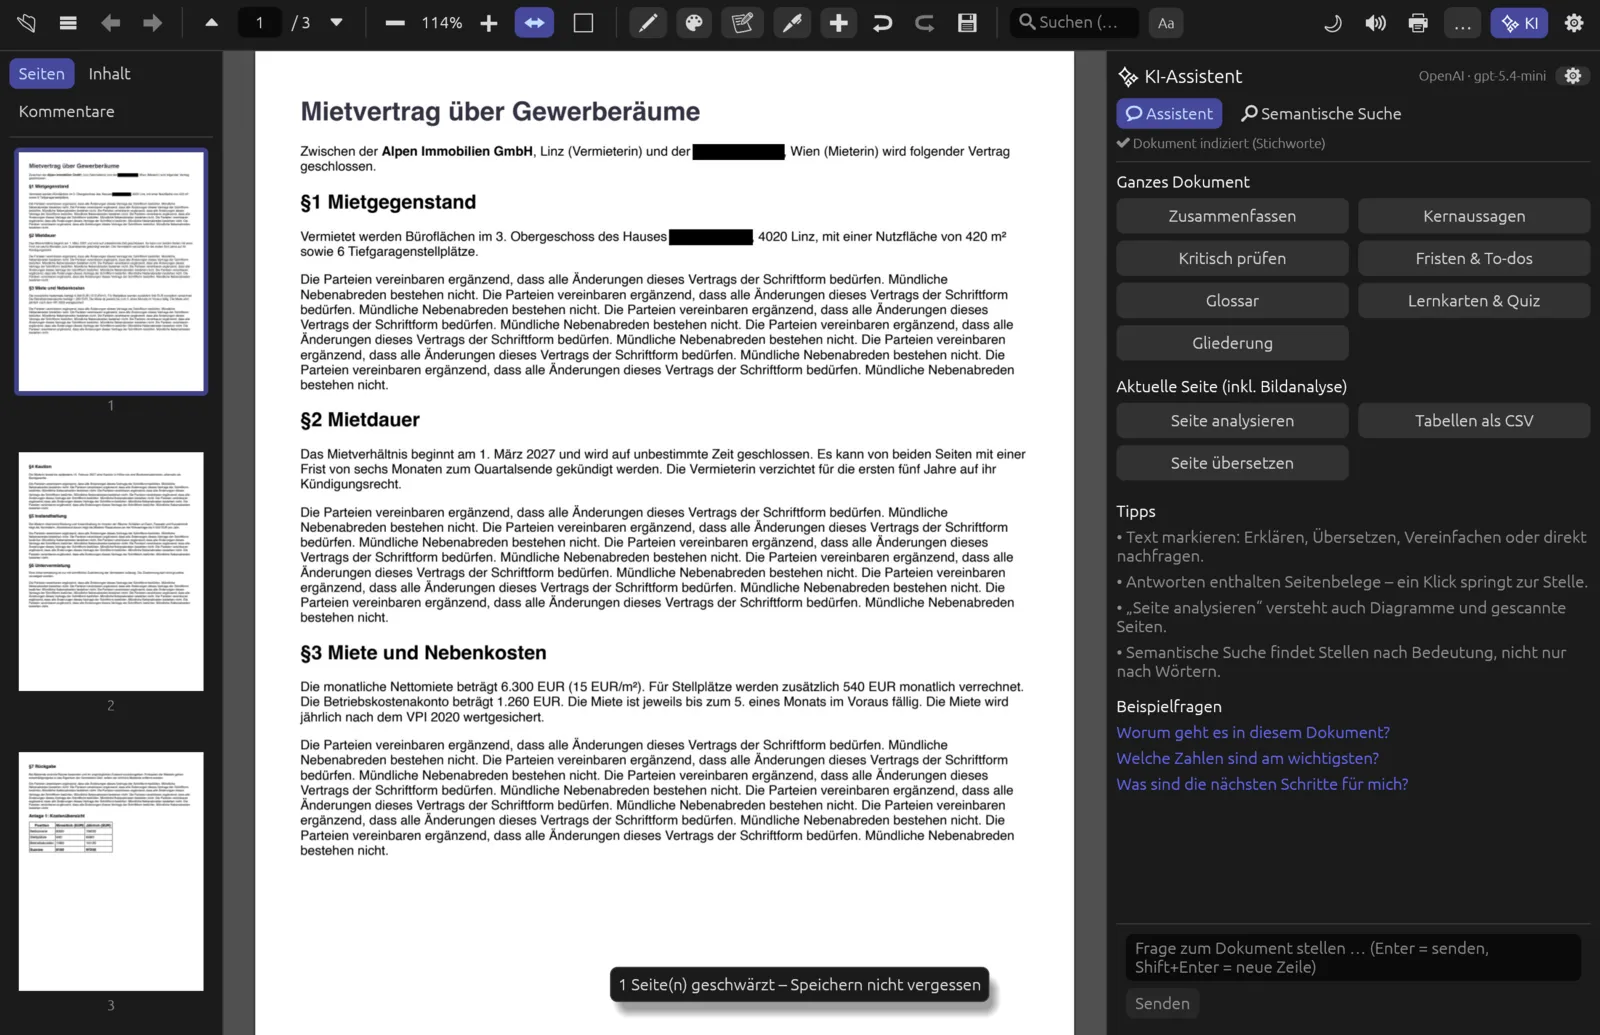
At first the redaction only exists in the open document. Only Speichern (Save, ⌘ S) writes it to the file – ideally save a copy with (Save as, ⌘ ⇧ S) and keep the original. Until you save, ⌘ Z undoes the redaction.
Because redacted pages are rebuilt as images (rendered at 200 dpi), they look slightly softer than before at high zoom. For password-protected PDFs you need to remove the protection first.
Redact a name throughout the document
- Press ⌘ F and type the name. The sidebar lists the hits.
- Choose . A message tells you how many areas were marked.
- Scroll through the document and check the red frames. If something is missing (a different spelling, say), search for it and mark it too.
- Click the red N schwärzen button in the edit bar.
- Save a redacted copy with .
AI suggestions for personal data
searches the whole document for personal data and marks every occurrence. Two methods work together:
- Patterns – Pagelier recognises email addresses, IBANs (also in groups of four) and phone numbers itself, without AI.
- AI – the configured AI provider also looks for names of people, postal addresses, dates of birth, account, ID, tax and insurance numbers and vehicle registrations. It is told to leave out companies, authorities and job titles.
Afterwards the edit bar opens with the marked areas, and a message gives the count and a few examples. If no AI is available, the message says so – in that case only the patterns were searched.
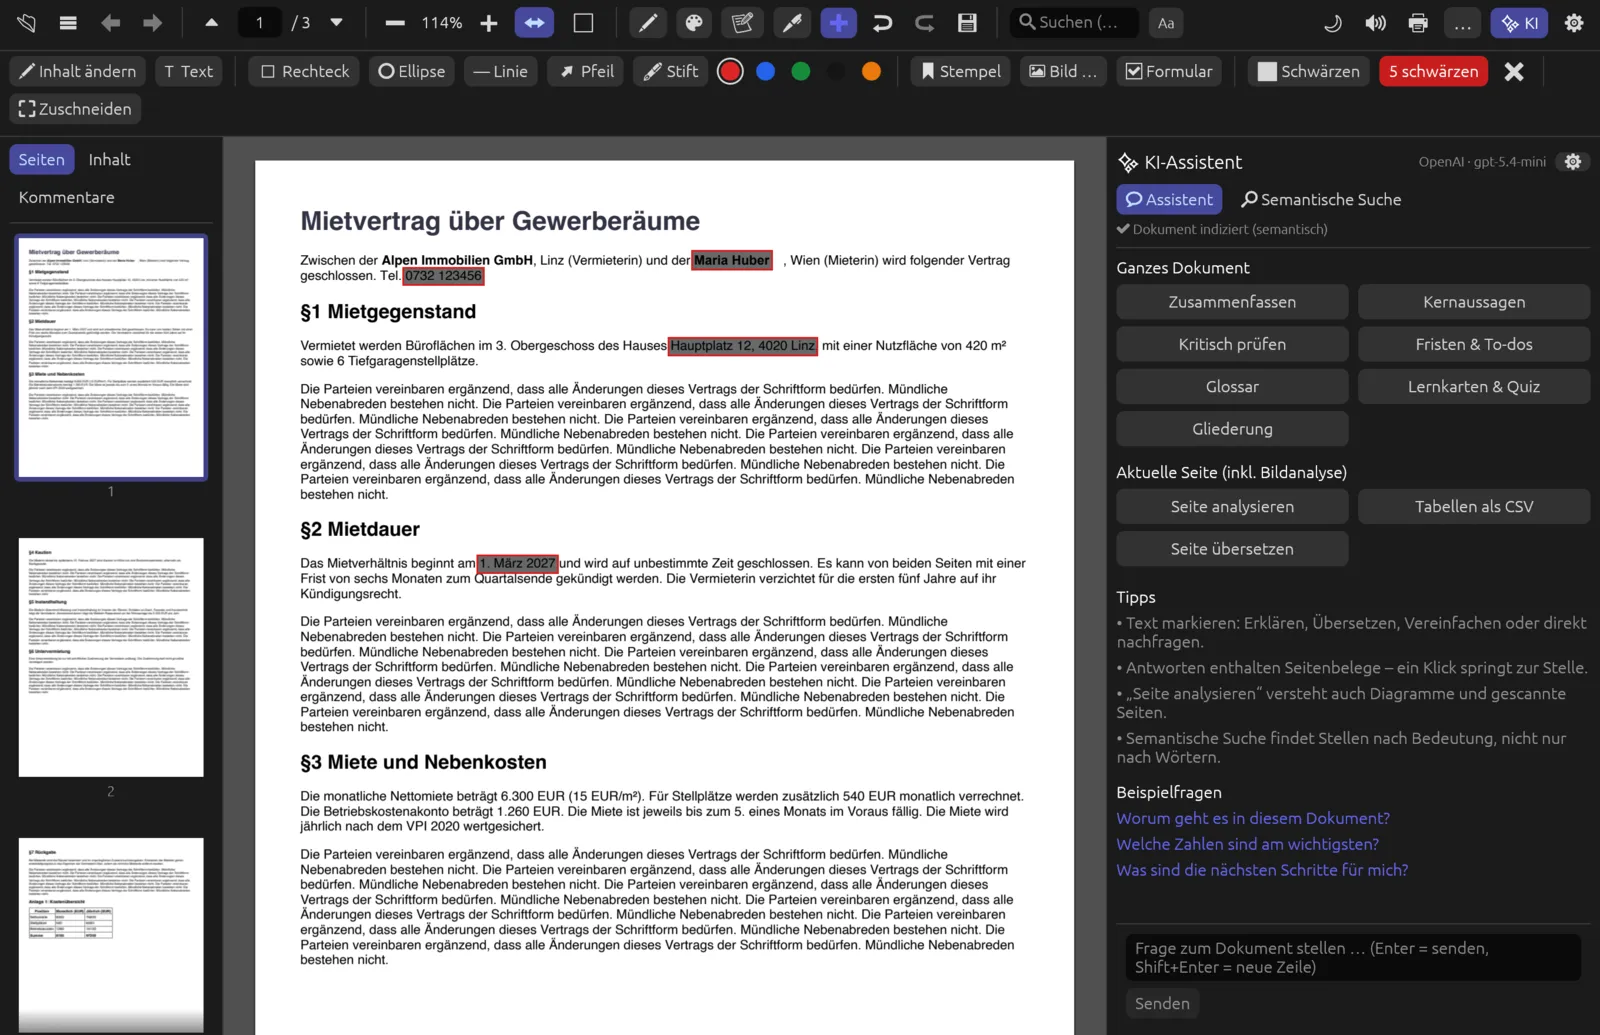
AI suggestions are an aid, not a guarantee. The AI sometimes misses things and sometimes suggests too much (a contract date in the picture above). Check every page before applying – discard surplus suggestions one by one with their ✖.
For the AI search, the text of the whole document is sent to the configured provider. With a local model it stays on your computer (see AI assistant).
Password protection
(Protect with password) saves an encrypted copy (AES-256). The open document itself stays unchanged and unprotected.
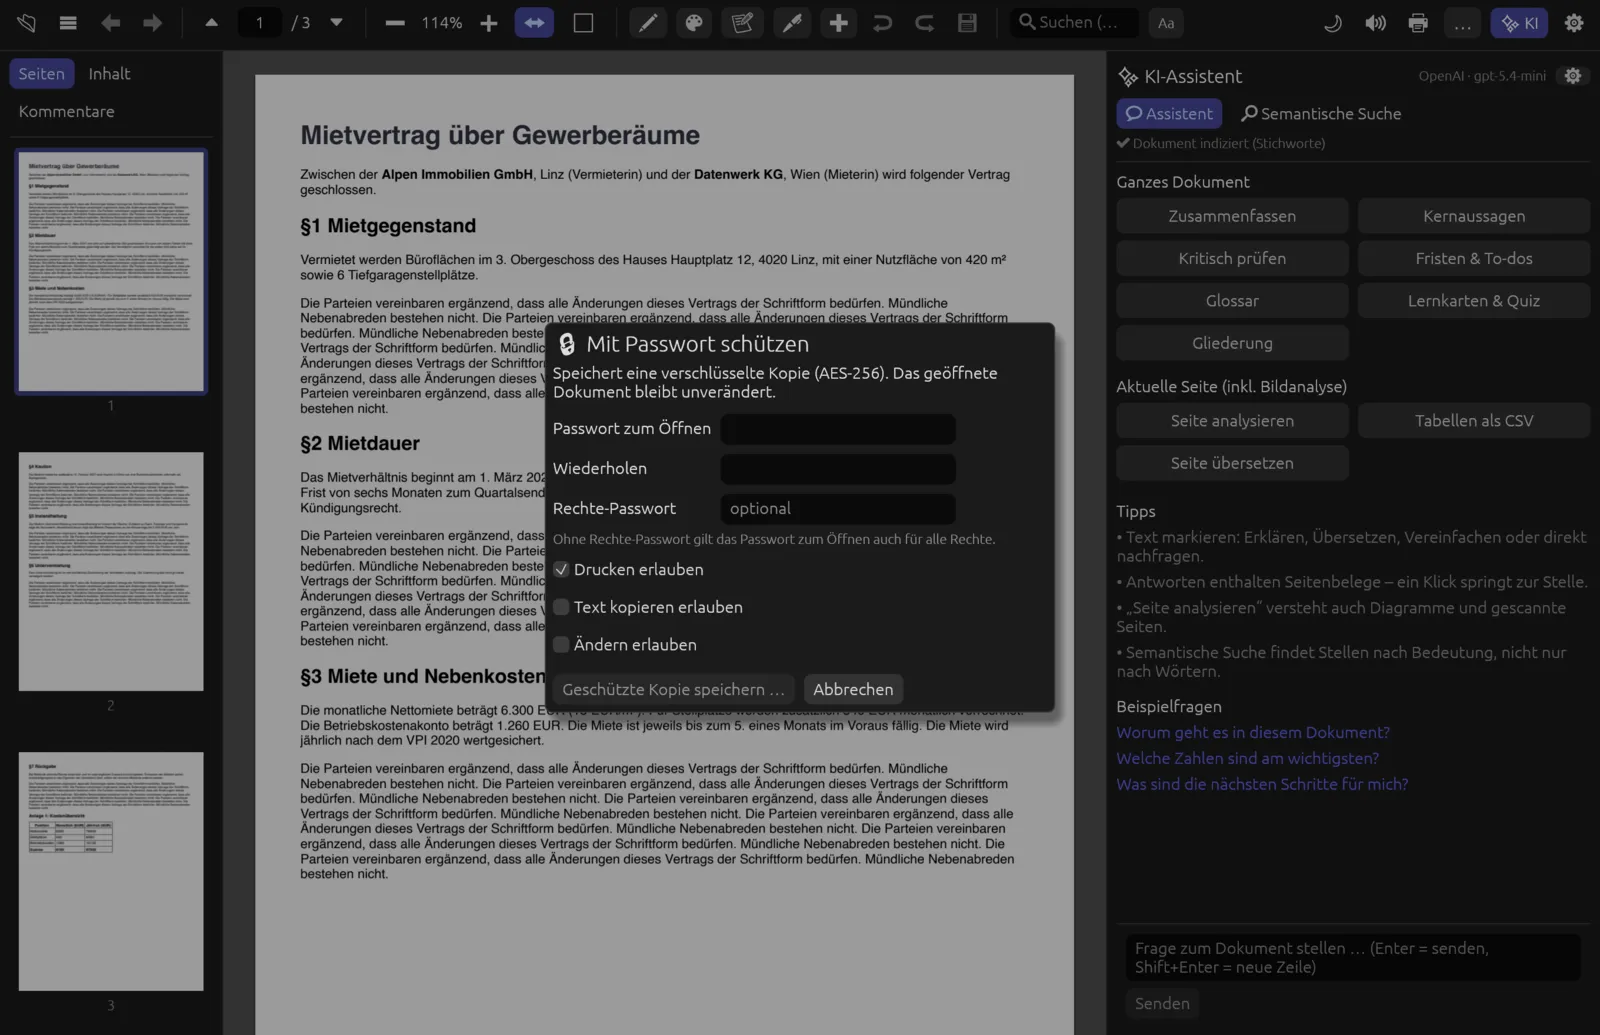
| Field | Meaning |
|---|---|
| Passwort zum Öffnen (Password to open) / Wiederholen (Repeat) | Without this password the file can’t be opened. Both entries must match, otherwise you see “Die Passwörter stimmen nicht überein” (the passwords don’t match). |
| Rechte-Passwort (Permissions password) | Optional. Whoever knows it may do everything; whoever only knows the password to open gets the restricted permissions. Without a permissions password, the password to open also grants all permissions. |
| Drucken erlauben (Allow printing), Text kopieren erlauben (Allow copying text), Ändern erlauben (Allow changes) | What a reader may do with the protected file. |
You can also set only a permissions password: the file then opens without a password, but with restricted permissions.
Save a protected copy
- Open .
- Enter the Passwort zum Öffnen twice and, if you like, a Rechte-Passwort.
- Tick or untick the permissions.
- Click Geschützte Kopie speichern … (Save protected copy) and choose a file name. Pagelier suggests “name-geschützt.pdf”; it won’t accept the name of the open document itself.
Permissions such as printing or copying are requests to the viewing program, not real protection – not every program honours them. Only the password to open is truly secure. Keep it safe: without it there’s no way back.
Removing protection
Open the protected file with its password (see Getting started). The menu then also shows 🔓 Passwortschutz entfernen (Remove password protection). Pagelier then reports that protection has been removed and the file will be written unprotected when saved. Only after Speichern is the file on disk unprotected. Redaction, digital signing and the fixes in the check tools all need an unprotected document.
Signing digitally
A digital signature proves two things: who signed, and that the file hasn’t changed since. Pagelier signs according to the PDF standard (PAdES baseline) and always saves a signed copy, which then opens in a new tab. A drawn signature is something else – see Forms & signature.
Creating or importing a certificate
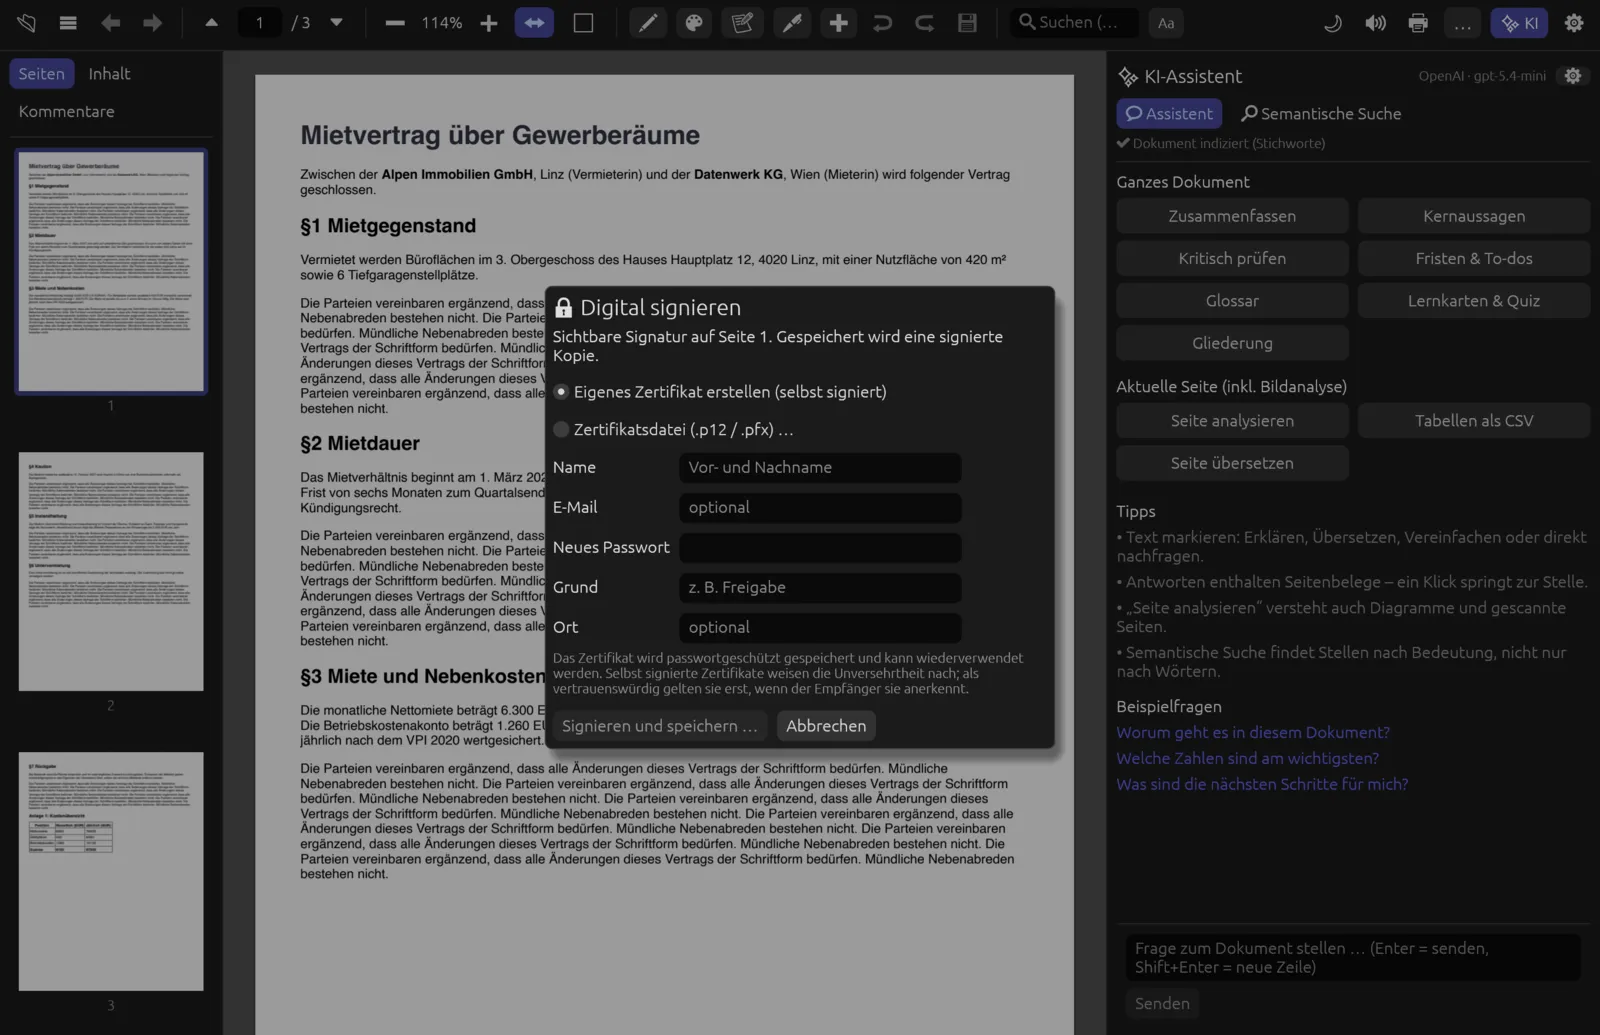
You need a certificate to sign. The Digital signieren (Sign digitally) dialog offers two options:
- Eigenes Zertifikat erstellen (selbst signiert) (Create own certificate, self-signed) – the first time, you enter Name, optionally E-Mail, and a Neues Passwort (new password). Pagelier creates a certificate (ECDSA P-256, valid for five years) and stores it password-protected in its data folder. From then on the option reads Mein gespeichertes Zertifikat (My saved certificate) and you only need the password.
- Zertifikatsdatei (.p12 / .pfx) … (Certificate file) – an existing certificate, for instance from your company or a certification authority. Pick the file via Wählen … (Choose) and enter its password. RSA and ECDSA P-256 keys are supported.
The Grund (Reason, e.g. “Freigabe” – approval) and Ort (Location) fields are optional; they appear in the signature.
Sign a document visibly
- Choose (Digital signature › Sign digitally).
- Drag a rectangle on the page for the visible signature field. A click without dragging creates an invisible signature.
- In the dialog, choose your certificate, enter the password and, if you like, Grund and Ort.
- Click Signieren und speichern … (Sign and save) and choose a name for the copy (suggested: “name-signiert.pdf”).
- The signed copy opens in a new tab. The field shows “Digital signiert von …” (digitally signed by), date, reason and location.
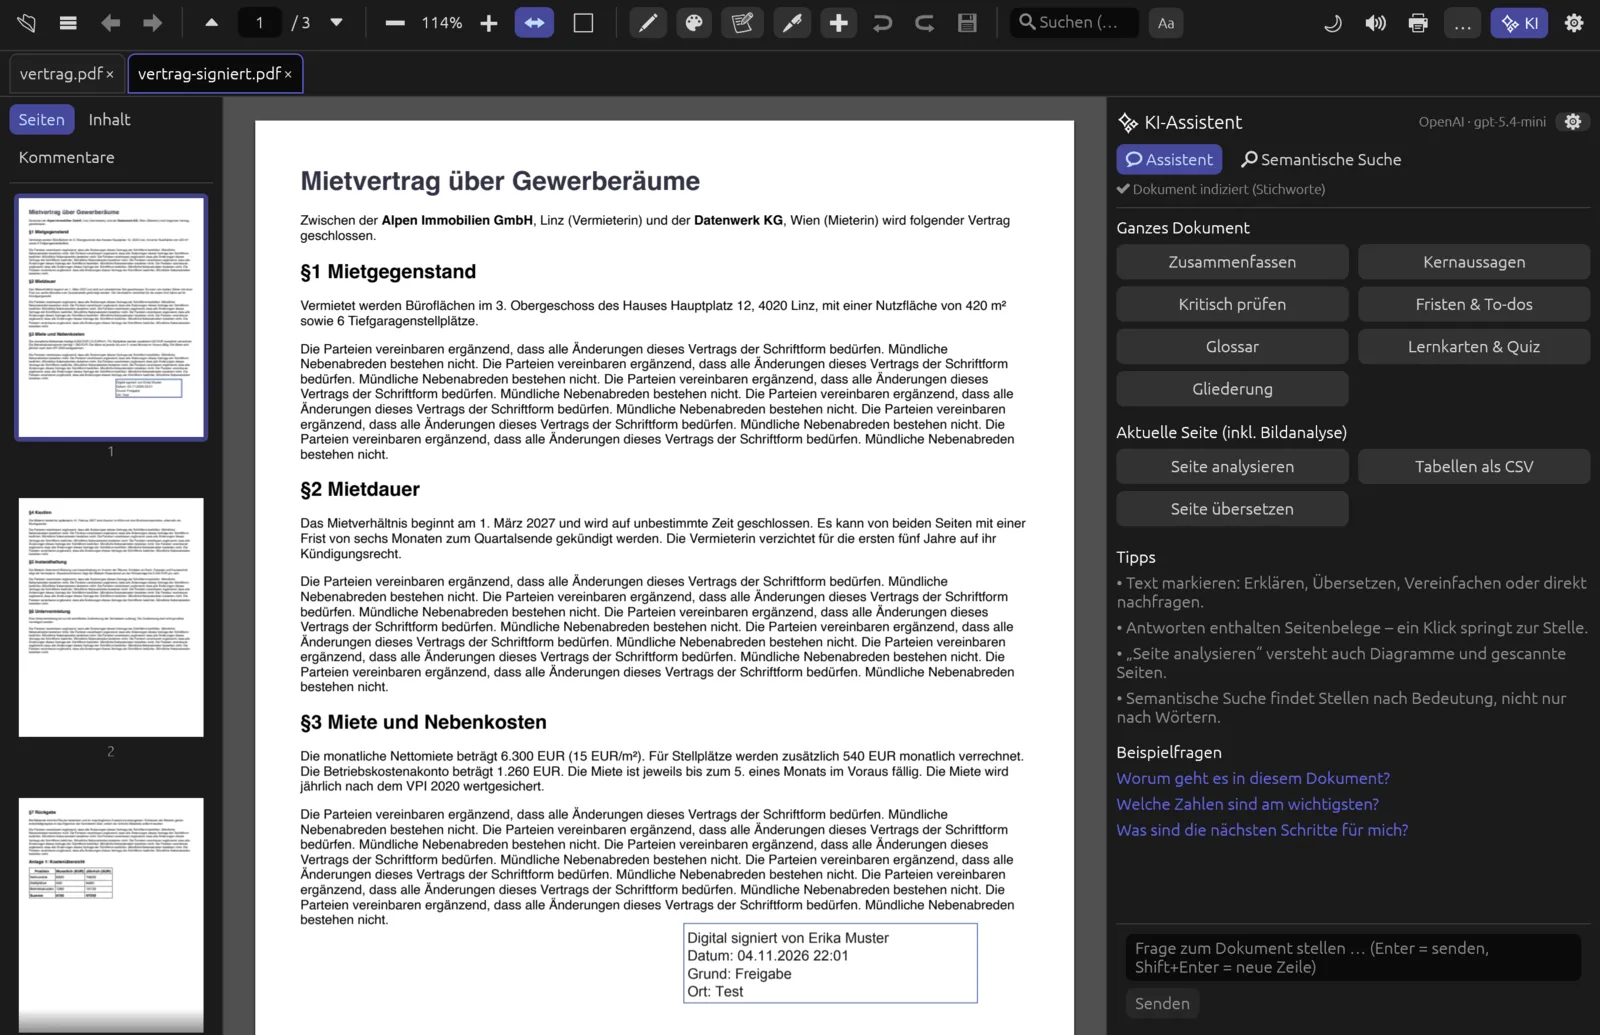
Only sign when the document is finished: any later change invalidates the signature. Unsaved changes in the open document are included in the signed copy.
Verifying signatures
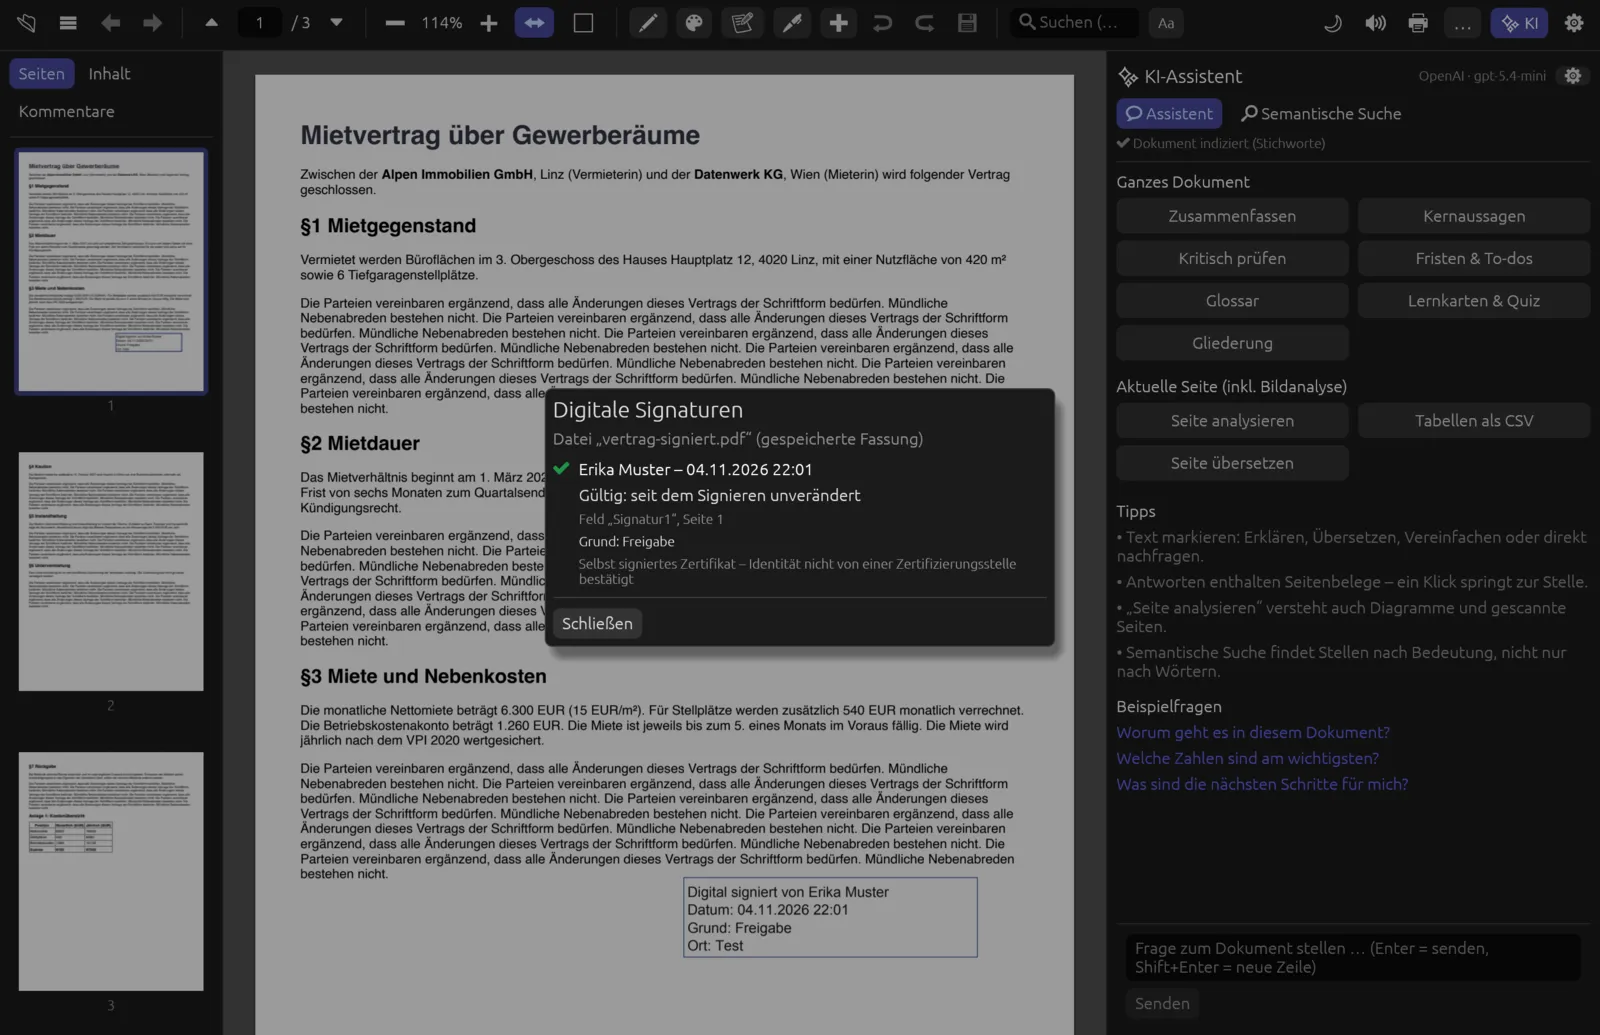
(Verify signatures) lists all signatures in the saved file – unsaved changes don’t count. For each signature you see signer and time, field and page, reason and status:
| Display | Meaning |
|---|---|
| ✔ Gültig: seit dem Signieren unverändert | Valid: the file is byte for byte as it was signed. |
| ✔ Gültig für die damalige Fassung | Valid for the version signed then; it was signed again or extended afterwards, but the signed version itself is unchanged. |
| ✔ Gültig, aber danach wurde das Dokument noch geändert | The last signature is correct but no longer covers the whole file. |
| ✖ Ungültig | Invalid: the document was changed after signing. |
| ⚠ with a message | The signature couldn’t be verified, e.g. “Verfahren nicht unterstützt” (method not supported). |
Limits
- No trust-chain check. Pagelier checks that hash and signature match, i.e. that the file is unchanged. Whether the certificate comes from a trusted authority, has expired or been revoked is not checked – every entry says so (“Vertrauenskette und Sperrstatus werden nicht geprüft”).
- Self-signed certificates prove integrity, not identity. They only count as trustworthy once the recipient accepts them. For legally qualified signatures you need a certificate from a certification authority.
- No timestamp service. The signing time comes from your computer.
- Protected PDFs can be neither redacted nor signed – remove the protection first.
- AI suggestions for redaction must always be checked by hand.